First impressions happen in the hallway, before guests even reach your living room. Yet hallways get treated as afterthoughts, painted builder beige and left bare except for a coat hook. That’s a wasted opportunity. A well-designed hall does more than connect rooms: it sets the tone for your entire home, maximizes flow, and can even solve storage headaches. Whether you’re working with a narrow corridor, a grand foyer, or a choppy ranch-style pass-through, smart design choices make the difference between “meh” and “wow.” This guide walks through the practical decisions, color, lighting, furniture, flooring, that turn your hallway from a forgotten tunnel into a space that actually works.
Table of Contents
ToggleKey Takeaways
- Hall interior design significantly impacts first impressions and home resale value, with buyers forming quick opinions about the entire property based on the entryway’s appearance and functionality.
- Light neutrals like warm whites, soft grays, and pale greiges visually expand narrow hallways, while bolder colors like deep blue or charcoal work in wider spaces when paired with strategic lighting.
- Multiple light sources—including recessed LED cans spaced 3 feet from walls and wall sconces mounted 60–66 inches high—prevent dark pockets and create layered ambiance in hallway spaces.
- Slim consoles (12–18 inches deep), floating shelves, and wall-mounted storage solutions keep hallways functional without crowding walkways or creating tripping hazards.
- Tough flooring materials like luxury vinyl plank, engineered hardwood, or textured porcelain tile withstand high traffic and moisture, while properly secured runners and rugs add warmth without compromising safety.
- Gallery walls, mirrors at hallway ends, and wainscoting with contrasting paint add visual interest and spatial depth while maintaining the practical flow that connects your home’s rooms.
Why Hall Design Matters More Than You Think
Hallways earn their keep in ways most rooms don’t. They’re high-traffic zones that take a beating from muddy boots, wet umbrellas, and furniture moves. They’re also transition spaces, the visual bridge between your front door and the rest of your home. Neglect them, and the whole house feels disjointed.
From a resale perspective, entryways and halls punch above their square footage. Buyers form opinions within seconds of walking through the door. A cramped, poorly lit hallway reads as “dated” or “small,” even if the rest of the house is solid. On the flip side, a bright, thoughtfully finished hall suggests care and attention throughout.
Functionality matters just as much. Halls are prime real estate for storage, think coat closets, built-in cubbies, or slim console tables. If your home lacks a mudroom, the hallway often has to do double duty. Good design keeps that gear organized without turning the space into an obstacle course.
Finally, halls connect the design language of adjacent rooms. The color palette and materials you choose here should echo, or intentionally contrast with, what’s happening in your living areas, bedrooms, and kitchen. It’s not about matching everything: it’s about creating a deliberate flow.
Assessing Your Hall Space and Layout
Before you pick paint or order runners, measure everything. Length, width, ceiling height, door swing clearances, and any offsets or jogs in the walls. Nominal dimensions don’t cut it here, you need actual measurements to avoid furniture that blocks doors or light fixtures that hang too low. Code typically requires a minimum 36 inches of clear width in hallways, but check your local IRC guidelines if you’re doing structural work or adding built-ins.
Note the light sources. Is there a window at one end, or are you working with artificial light only? Where are the switches, and do they control overhead fixtures, sconces, or nothing useful? Mark electrical outlet locations while you’re at it, you might want to add more if you’re planning console tables or plug-in accent lighting.
Identify obstacles: HVAC vents, thermostat boxes, breaker panels, smoke detectors. These can’t move easily, so design around them. Also check for load-bearing walls if you’re considering opening up doorways or removing a wall section. That requires an engineer’s sign-off and a permit in most jurisdictions.
Finally, consider traffic patterns. Does this hall serve as the main route to bedrooms, bathrooms, or a home office? Will kids and pets barrel through daily? That intel shapes your material choices, durable flooring, scuff-resistant paint, furniture that won’t tip if bumped.
Color Schemes That Make Hallways Feel Spacious
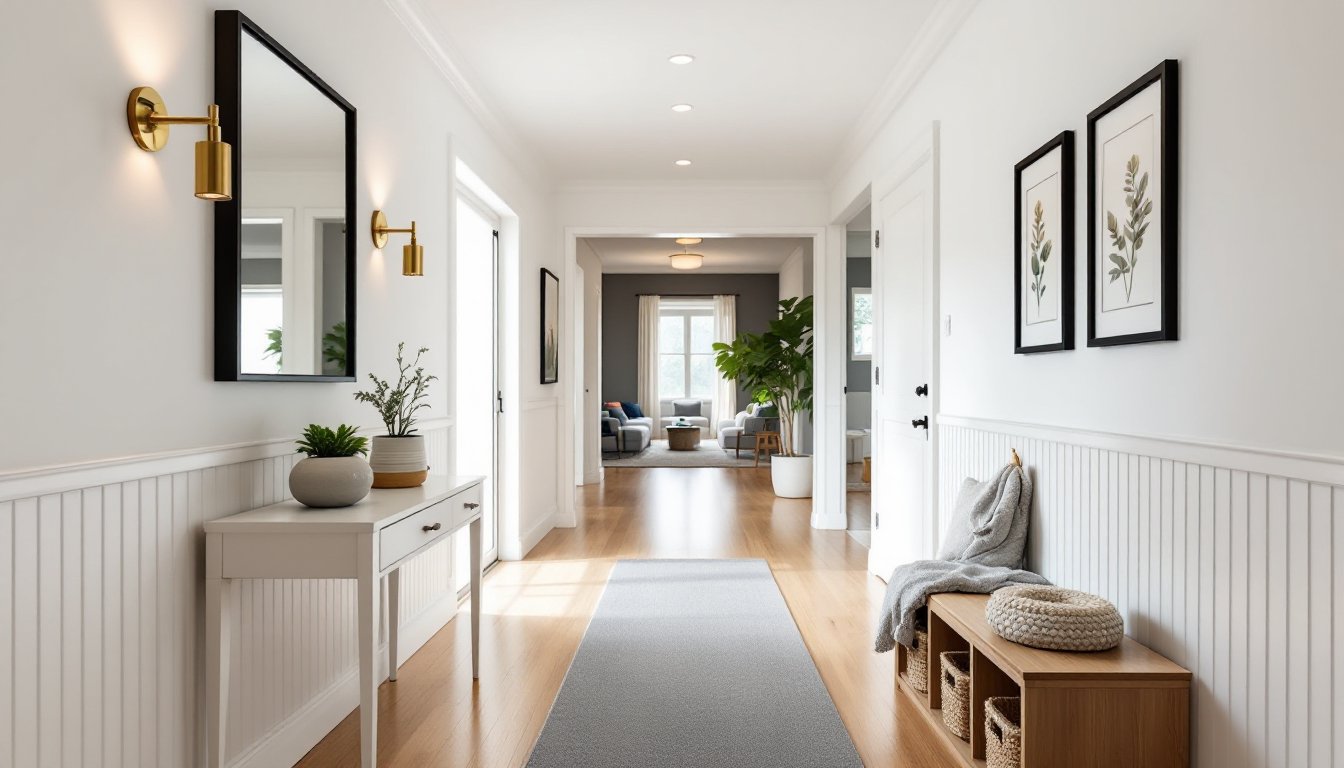
Narrow, windowless halls benefit from light neutrals, soft whites, warm grays, or pale greiges. These reflect available light and visually push walls outward. But “light” doesn’t mean sterile. A warm white with a hint of cream or blush feels inviting: stark cool white can read clinical.
If your hall gets natural light or you’re working with decent width (48 inches or more), you can go bolder. Deep blues, charcoal, or even black create drama and make adjacent rooms feel brighter by contrast. Just pair dark walls with ample lighting, sconces or recessed cans spaced every 4 to 6 feet, or the space turns into a cave.
Consider an accent wall at the far end of a long corridor. A saturated color or patterned wallpaper draws the eye forward and shortens the visual tunnel effect. Many designers use contrasting elements to add dimension without overwhelming small spaces.
Ceiling color matters, too. Painting the ceiling a shade lighter than the walls adds perceived height. In older homes with 8-foot ceilings, a high-gloss or satin finish on the ceiling bounces light and tricks the eye. Semi-gloss or satin paint on walls also helps: it’s easier to wipe down than flat when you’re dealing with fingerprints and scuffs.
Test samples in your actual hallway before committing. Paint looks different under artificial light and in narrow spaces. Slap a couple of 2×2-foot patches on the wall and live with them for a few days.
Strategic Lighting Solutions for Narrow Corridors
Overhead lighting is non-negotiable, but a single ceiling fixture in the middle of a long hall creates dark pockets at both ends. Plan for multiple sources: recessed 4-inch or 6-inch LED cans spaced evenly, or a track system if you want adjustable aim. Recessed lights should sit about 3 feet from the wall to avoid harsh shadows.
Wall sconces are a hallway’s best friend. Mount them at 60 to 66 inches above the floor (roughly eye level) and space them 8 to 10 feet apart. Sconces add layers, highlight artwork, and free up ceiling space. Swing-arm or picture lights work well if you’re gallery-style hanging art.
For narrow halls, avoid fixtures that protrude more than 4 inches from the wall, they’re head-bumpers and visual clutter. Flush or semi-flush mounts keep clearance safe. If you’re installing new fixtures, make sure circuits can handle the load: older homes may need an electrician to add a dedicated circuit if you’re going heavy on lighting. That’s NEC territory, and it’s not a DIY guess.
Dimmer switches give flexibility. Bright task lighting for when you’re carrying laundry or cleaning, softer ambiance for evenings. LED bulbs (2700K to 3000K color temperature) offer warm light and last years, but check that they’re dimmable if you’re adding a dimmer.
Natural light is gold. If your hallway has a window, don’t block it with heavy drapes. Sheer panels or top-down/bottom-up shades let light in while maintaining privacy. End-of-hall windows can be enhanced with mirrors on side walls to bounce daylight deeper into the corridor, a technique featured in many hallway design galleries.
Furniture and Storage Ideas That Don’t Crowd
Standard console tables run 30 to 36 inches wide, too deep for most hallways. Look for slim consoles at 12 to 18 inches deep, or wall-mounted floating shelves. A floating shelf at 32 inches high works as a catch-all for keys and mail without eating floor space.
Bench seating doubles as storage if you choose a lift-top or cubby design. Keep depth under 16 inches to preserve walkway clearance. Pair it with wall hooks or a coat rack above, just make sure hooks are anchored into studs, not drywall alone. Toggle bolts work if studs don’t line up, but they’re only good for lighter loads.
In wider halls (48 inches or more), a narrow bookshelf or étagère can work, especially near a dead-end wall. Keep it under 12 inches deep and anchor the top to the wall with L-brackets, tip-over hazards are real, especially in homes with kids or pets.
Avoid freestanding furniture in high-traffic paths. A wobbly side table or unsecured umbrella stand is a tripping hazard. Wall-mounted solutions, hooks, shelves, pegboards, keep the floor clear and make vacuuming easier.
Built-ins are the gold standard if you’ve got the budget. A shallow closet with bi-fold or pocket doors, or a floor-to-ceiling cubby system, maximizes storage without protruding. This is a job for a finish carpenter if you’re not comfortable with precise miter cuts and scribing to uneven walls. Achieving a balanced and functional design often requires custom solutions tailored to your space.
Wall Decor and Art Placement Tips
Gallery walls work beautifully in hallways, you’ve got linear space and a captive audience. Hang art at 57 to 60 inches on center (museum standard), adjusting slightly if your household skews tall or short. For a multi-piece gallery, lay the arrangement on the floor first, then transfer measurements to the wall using painter’s tape as guides.
Frame weight matters. Use picture hangers rated for the load, not random nails. A 16×20 framed print can weigh 5+ pounds: a large canvas or framed mirror can hit 20 pounds. Anchoring into studs is ideal for anything over 10 pounds. If studs don’t align, use heavy-duty drywall anchors rated appropriately.
Mirrors are functional and spatial magic. A large mirror at the end of a hallway visually doubles the length. Lean an oversized floor mirror against the wall (secure the top with a cleat or bracket) or hang a statement piece with a heavy-duty French cleat system.
Avoid cluttering narrow halls with too many small pieces. One or two larger artworks or a cohesive series reads cleaner than a dozen tiny frames. If you’re mixing frame styles, keep a common element, color, mat style, or subject matter, to tie it together, an approach highlighted on design platforms like MyDomaine.
Textured wall treatments, beadboard wainscoting, board-and-batten, or even peel-and-stick 3D panels, add interest without taking up floor space. Install wainscoting to 32 to 36 inches high, paint it a contrasting color, and top with a simple cap molding.
Flooring Options to Enhance Flow and Durability
Hallways demand tough flooring. High foot traffic, dirt tracked in from outside, and the occasional dropped toolbox mean your material choice needs to stand up to abuse. Luxury vinyl plank (LVP) is a top pick, waterproof, scratch-resistant, and easier to install than hardwood. Look for products with a 20 mil wear layer or thicker for heavy-use areas.
Engineered hardwood offers real wood aesthetics with better dimensional stability than solid hardwood, especially in climates with humidity swings. It’s DIY-friendly if you’re comfortable with a miter saw and can follow a floating-floor install. Leave a 1/4-inch expansion gap at walls and doorways: cover it with trim or transition strips.
Tile, ceramic or porcelain, is nearly indestructible and works especially well in entryways that see wet shoes. Use slip-resistant finishes (matte or textured, not high-gloss). Grout lines are a cleaning consideration: larger tiles mean fewer grout lines to scrub. Seal grout with a penetrating sealer after install to resist stains.
Runners and area rugs add warmth and can define zones, but they’re also trip hazards if not secured. Use non-slip rug pads underneath, and choose low-pile or flatweave styles that won’t bunch under foot traffic. Washable or stain-resistant fibers (nylon, polypropylene) are smarter than delicate wool in a muddy-boot zone.
Whatever you choose, ensure it flows logically into adjacent rooms. Abrupt transitions, luxury vinyl to carpet to tile in 10 feet, look choppy. If you must mix materials, use transition strips (T-molding, reducer strips) that are code-compliant and flush to avoid tripping. Some transitional design strategies help blend different flooring types cohesively.
Acclimate flooring materials to your home’s temperature and humidity for 48 to 72 hours before install. Skip this, and you risk buckling or gaps as the material expands or contracts post-install. For more creative takes on durable, stylish flooring in compact spaces, browse ideas on Homedit.