Building a home wine bar isn’t just about bottles and shelves, it’s about creating a dedicated space where evenings feel more intentional and entertaining becomes effortless. Whether you’re working with a basement corner, a butler’s pantry, or converting a spare closet, the right design decisions will turn any square footage into a polished retreat. This project demands more than aesthetic choices: it requires balancing storage capacity, ventilation, lighting, and workflow in a compact footprint. Done well, a wine bar becomes the kind of space guests gravitate toward and homeowners actually use.
Table of Contents
ToggleKey Takeaways
- Wine bar interior design requires balancing storage capacity, ventilation, lighting, and workflow to transform any space into a functional and inviting retreat.
- Maintain wine storage at 55-58°F with 60-70% humidity, and choose locations away from direct sunlight—basements and enclosed pantries are ideal for stable temperature control.
- Install warm-white LED lighting (2700-3000K) under cabinets and shelves while avoiding UV exposure, and skip heat-generating bulbs that will degrade wine quality.
- Select durable, moisture-resistant materials like quartz countertops, porcelain tile flooring, and hardwood cabinetry to withstand spills, condensation, and temperature fluctuations.
- Design your layout following the work triangle principle with 42 inches of clearance in front of the bar, positioning storage, serving counter, and seating for efficient, comfortable flow.
- Horizontal bottle storage and open stemware racks maximize accessibility while protecting glassware from breakage—avoid stacking glasses more than two deep.
Essential Elements of Wine Bar Interior Design
Every functional wine bar, whether commercial-grade or home-scale, relies on four core components: proper wine storage, serving counter space, glassware organization, and controlled environment.
Wine storage defines the footprint. Plan for at least 12-18 inches of depth to accommodate standard wine racks or modular cube systems. Horizontal bottle storage keeps corks moist and prevents oxidation, essential for wines intended to age.
Counter space needs to handle more than you’d think. Budget a minimum 24 inches wide by 18 inches deep for setting down glasses, aerating decanters, and prepping garnishes. If you’re installing an under-counter wine fridge, allow 3-4 inches of clearance on either side for ventilation per manufacturer specs.
Glassware storage works best when visible but protected. Open shelving with 1-inch diameter dowels or stemware racks mounted under cabinets keep glasses accessible without occupying counter real estate. Avoid stacking glassware more than two deep, it’s a recipe for chips and breakage.
Environmental control matters more than most DIYers realize. Wine thrives between 55-58°F with 60-70% humidity. If your bar sits in a climate-controlled room, you’re ahead. Basement or garage conversions may need supplemental insulation (R-13 minimum in walls) and a standalone HVAC solution or wine refrigeration unit. Skip this step, and you’ll be drinking expensive vinegar within a year.
Choosing the Perfect Location for Your Home Wine Bar
Location dictates success. The best wine bar spots share three traits: they’re away from direct sunlight, maintain stable temperatures, and don’t require major structural work to access plumbing or electrical.
Basement corners are ideal. They stay cool year-round, offer privacy, and typically have concrete walls that simplify mounting heavy wine racks. Downside: you may need to add a dehumidifier if moisture levels creep above 70%.
Butler’s pantries or walk-in pantries convert beautifully if they have at least 40-50 square feet of usable floor space. You’ll likely have electrical nearby, and the enclosed nature helps with temperature stability. Check for load-bearing walls before removing shelving or cabinetry, pantries in older homes sometimes share framing with staircases.
Under-stair nooks maximize dead space but require creative carpentry. Sloped ceilings mean custom shelving and racks cut to fit. This is where a miter saw earns its keep, pre-cut angles ensure clean joints on angled trim.
Garage conversions work in temperate climates but demand insulation upgrades. Uninsulated garage walls won’t maintain the stable environment wine needs. Plan on R-19 batt insulation in exterior walls and a mini-split HVAC unit if you’re serious about wine preservation.
Avoid kitchens. Heat from ovens and dishwashers, plus vibration from appliances, accelerates wine degradation. If a kitchen bar is your only option, invest in a dual-zone wine fridge to offset environmental variables.
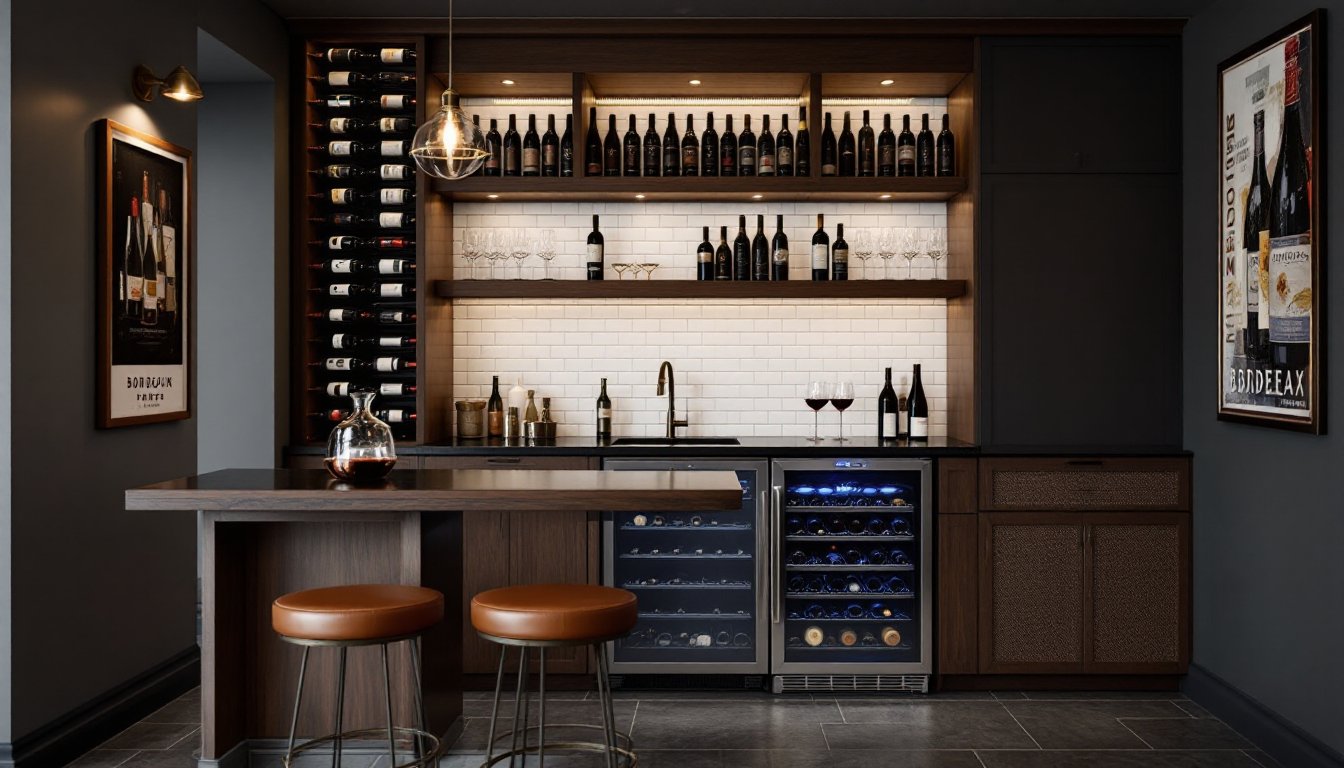
Wine Storage Solutions That Combine Function and Style
Wine storage falls into three categories: modular racking, built-in cabinetry, and refrigerated units. Each has trade-offs in cost, capacity, and installation difficulty.
Modular wine racks (wood or metal) are the DIY-friendly choice. Systems like pine cube racks or powder-coated steel units install with basic tools, level, drill, and wall anchors rated for 50+ lbs if mounting to drywall. Secure directly to studs when possible, especially for racks holding more than 20 bottles. These units range from $100-$500 depending on capacity and material.
Built-in cabinetry delivers a custom look but requires intermediate carpentry skills. Use 3/4-inch plywood for shelving (not particleboard, it sags under wine’s weight). Space shelves 12-14 inches apart vertically to fit standard bottle heights. Pre-drill and countersink all screws to avoid splitting. If incorporating diamond bins (the X-shaped wine cubbies), cut dados with a router for cleaner joinery than butt joints.
Wine refrigerators solve climate control but demand electrical planning. Most units pull 3-5 amps on a standard 120V circuit, verify your breaker has capacity before installation. Built-in models need front ventilation, so leave toe-kick space open. Freestanding units vent from the back and can’t be enclosed without overheating.
For dedicated wine cellars or high-capacity storage, commercial racking systems from suppliers like VintageView or Wine Enthusiast offer design-forward options engineered for serious collectors. These installations often exceed DIY scope and benefit from professional layout.
Lighting Design to Set the Perfect Ambiance
Lighting a wine bar means solving two problems: creating ambiance and protecting wine. UV exposure degrades wine faster than temperature swings, so every light source matters.
LED strips are the go-to for under-cabinet and shelf accent lighting. Choose warm white (2700-3000K) to avoid the clinical look of daylight LEDs. Install strips with adhesive backing along the front edge of shelves, 1-2 inches back from the face so the diodes don’t shine directly in eyes. Most LED strips pull 12V DC and require a transformer, conceal this inside cabinetry or behind a false panel.
Recessed can lights work for general illumination but need careful placement. Avoid aiming cans directly at wine bottles. Instead, position 6-inch recessed fixtures to wash light across walls or countertops. Use LED bulbs rated at 800-1000 lumens for a 100-square-foot space. Dimmer switches are non-negotiable, install a 600W-capable electronic dimmer compatible with LED loads.
Pendant lights over the bar counter add visual interest. Hang them 30-36 inches above the counter surface to avoid head-knocking. Wire them into the same dimmer circuit as recessed lighting for cohesive control.
Skip any lighting that generates heat, halogen and incandescent bulbs will cook your wine. If you’re retrofitting existing fixtures, swap in LED equivalents rated for enclosed spaces to prevent overheating.
For serious wine collectors, install UV-filtering glass in any windows or cabinet doors with glass inserts. Standard window film blocks up to 99% of UV, apply it yourself with a squeegee and soapy water.
Selecting Materials, Finishes, and Color Palettes
Material choices shape durability and aesthetic. Wine bars see spills, condensation, and temperature swings, surfaces must withstand all three.
Countertops: Quartz and granite are top picks. Both resist staining and etching from wine’s acidity. Quartz offers more color consistency and doesn’t require sealing, while granite needs annual sealer application to prevent absorption. Budget $50-$100 per square foot installed for either. Butcher block looks warm and inviting but demands vigilance, apply food-safe mineral oil monthly to prevent drying and cracking.
Backsplashes: Subway tile remains a classic for good reason. 3×6-inch ceramic tiles install with basic tiling skills (notched trowel, tile spacers, grout float). Stick with sanded grout for joints wider than 1/8 inch. For a higher-end look, consider natural stone mosaics or glass tile, both of which catch light beautifully. Seal grout lines with penetrating sealer after curing to resist wine stains.
Cabinetry: Hardwood or plywood construction beats MDF in humidity-prone environments. If painting cabinets, prime with bonding primer and finish with satin or semi-gloss latex for easy wipe-down. Stained finishes demand polyurethane top coat (three coats minimum) to protect against moisture.
Color palettes: Deep jewel tones, burgundy, forest green, navy, complement wine culture without feeling thematic. Pair with warm metallics (brass, aged bronze) in hardware and fixtures. Lighter palettes work too: soft grays and creams create modern, elegant backdrops that let wine labels and glassware stand out.
Flooring: Porcelain tile or luxury vinyl plank (LVP) handle moisture and foot traffic better than hardwood or carpet. If installing over concrete (common in basements), lay 6-mil poly vapor barrier first to prevent moisture wicking.
Furniture and Layout Ideas for Optimal Flow
Layout determines whether your wine bar feels functional or cramped. Follow the work triangle principle: position storage, serving area, and seating in a logical flow that doesn’t require backtracking.
Bar height vs. counter height: Standard bar counters sit at 42 inches, requiring bar stools at 30-inch seat height. Counter-height bars at 36 inches pair with 24-inch stools and feel less formal. Choose based on your ceiling height and who’ll use the space, taller setups work in basements with 8-foot ceilings or more.
Seating: If space allows, add 2-4 stools. Allow 24-30 inches of width per seat along the bar front and 36 inches of clearance behind stools for walkways. Backless stools tuck under counters more compactly than backed versions.
Storage efficiency: Mount floating shelves at 15-18 inches above the counter for frequently used bottles or decorative glassware. Use the space between counter and upper cabinets for wine glass racks or open shelving, this zone stays visible and accessible.
Traffic flow: Maintain a 42-inch clearance in front of the bar for comfortable movement, especially if two people will use the space simultaneously. In tight quarters, a galley layout (wine storage on one wall, serving counter opposite) maximizes efficiency.
Many inspiring commercial examples translate well to residential scale, look for clever use of vertical space and integrated seating. If your space feels more utilitarian, incorporating principles of balanced design can elevate even compact bars.
Accessories: Include a pull-out cutting board for cheese prep, a small sink if plumbing allows (requires P-trap and drain line plus shutoff valves), and task lighting over the work surface.
Conclusion
A well-executed wine bar balances technical requirements, climate control, proper storage, task lighting, with design choices that make the space inviting. Start with a location that supports stable conditions, invest in storage that protects your collection, and select finishes that can handle real-world use. The best home wine bars aren’t showpieces: they’re hardworking spaces that make entertaining feel less like a production and more like an occasion.